Monday, July 21, 2025

What a Week!

 
Well it's been a very busy week.

All the units for the sew long were completed.

They managed to get stitched up during

the visits with family,

a bit of yard work,

some sewing workroom cleaning,

and a lazy, rainy afternoon with small visitors.

We had a dinner out with one offspring.

a golf tournament with another,

cat care for a third, and the lazy rainy day

with the last. 

Looking back, it was quite productive week.


All the sew along units are done.

It turns out there are two blocks for this quilt, surprise!

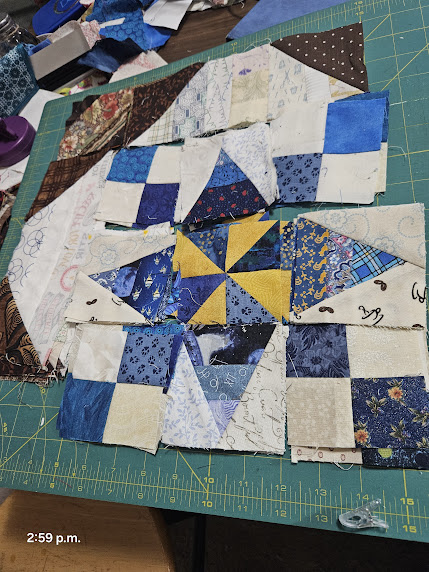
Block A used the pinwheels,


and the blue peaky and spikes,


as well as a large stack of four patches!


A few sashing blocks were thrown in for good measure,

The small diagonal string units

finish up block A as cornerstones.


I did a lot of catching up over the past two weeks,

 and some of  the units I've been making,

went together nicely to create block B.

 There were some small challenging pieced kite blocks,

and even more peaky and spikes.


The center feature block is a

commonly used scrapbuster block,

a small square surrounded by strips.

Put them all together with a 

few inverted sashing blocks and 

they spell anything but mother.


Whoops!


There's still a few pieces left.

A complicated pieced diamond rectangle,

four solid blue squares, hourglass units and and some two inch

strips of accent fabric. There are also some sashing 

units and some diagonal squares. 


I think a pieced border was mentioned

 so unless I over-sewed a lot,

these should be the components to finish  off the top.


In the midst of all that, I won spool chicken!

I managed to sew up my block and 

still have a few inches left on my upper thread.


Tada!


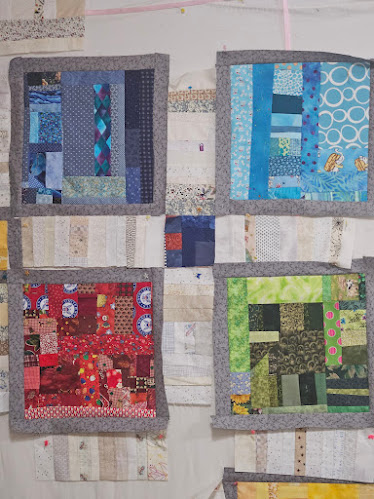
I also got to experiment with a different layout

for those prize winning blocks from last week.

Very fun!


We even picked some early cherries.

Have a great week stitching!!

Stay safe and sew on. 

Linking up with:


8s & 10s Together!

 This adorable stashbuster was started a few weeks ago,

after a sample shown by a friend and 

a visit down the rabbit hole of Pinterest.

Here is the beginning of the project.


Strings of assorted sizes have collected over last a little while

and many have come in the door from other quilters.

I had a some enjoyable days stitching up 

lots and lots of strip sets. 

Sometimes, it feels good to just get the machine humming!

The strip sets were trimmed to roughly 11" in in length,

and exactly 8 1/4" in wide.

Then one and a half inch wide strips of the unifying colour, 

in this case black, were added to each side.

A final trim  to 10" X 10 " and the blocks are ready to assemble.

I made 57 blocks for each of the twin quilts I'm assembling,

Each quilt will be seven blocks wide by eight blocks long .

The twin a nice size and will make great gifts or donations.

Fortunately, or unfortunately I still have lots of strings left.

I ended up with enough strip sets and blocks to make

three twin size quilts! My gift closet will be a restocked!


Here we go! 


I'm at the joining phase. This stack is alternated in 

direction and should sew up quickly!

Stayed up late and here is the first top!

It finished at 67" x 77".


It is quite dramatic and gave me a few challenges

A few of the blocks were 10 1/4".

It sounds like a very small variance but it did add up.


I ended up fixing a few issues by getting out the ripper

and trimming off that extra quarter inch.

The next set of blocks will be verified before I start stitching.

Only two more tops to go!


Have a great week!


Monday, July 14, 2025

Sew Along Stitching!

 Things are heating up with the sew along and 

the end is just around the corner.

Step 8 is finally finished, and wow,

 there were a lot of pieces to do!


Brown half squares were added to each

 corner of the 9 1/2" beige units. 


The cutoffs were used to make small hourglass units.


This process didn't use up all the cutoffs!


There were still bunches of cutoffs to deal with.

I sewed them up into the half squares 

before they were cut off of the parent piece. 

There is about 1/2" distance between the seams.


This just seems a little easier to me

and keeps the pieces out of the scrap bag.

Now I have a goodly stacks of half squares 

to do with as I will.

You'll notice there are two different sizes.

Sometimes my stitch width isn't as accurate as I would like.

"No scrap left behind",

 so I cut 2 1/2" as well as 2"inch squares

 out of the bonus half squares.


There's actually an unfinished top behind me,

that could really use some half squares

to finish up another block.


So that is Step 8 of  


I'll get to work on steps 9 and 10 and keep you posted.

If anyone is wondering about that race I was in last week,

Look at this!

I won! 25 string blocks in two hours!


Stay safe and sew on.

Linking up with:


Put Your Foot Down

Free Motion Mavericks

Off the Wall Friday

Finished or Not Friday

Patchwork & Quilts

RSC 2024

Oh Scrap!

Stash Report

Stitching Stuff


Monday, July 7, 2025

Ready, set, go!

 This week I am participating in something 

completely different, a strip block race! 

Never having sewn for speed,

 I am not sure what to expect!

I'm sewing on a featherweight so 

it is pretty speedy.

All oiled and ready to go!


We're to prepare our strips any 

way we like so I am setting mine

up like I do when I sew them at home. 

The finished block size is 10" cut.

I do have some design boards I use

to set up my scrap blocks. 

My BB made them for me.

They work wonderfully for laying 

out all kinds and of blocks. 


You can see they have had a lot of use!

I don't think they will be used in this

project but I have used them for 

crumb and string blocks as well as 

blocks with many units.

The blocks for "race" will be 

10" cut so I will precut some 

strips to make the correct size.

After a few trials, here is what I've

come up with!

The blocks for the race need to be 

made with strips/strings 2" wide or

less. The corners can be triangles

cut form 4" or 5" squares.

Soo..

I cut a bunch of 10" papers,


gave them a diagonal fold to 

keep me straight,


and started looking for strips.  

Then I organized them into piles 

that matched my sewing order

and I am ready! I have these convenient

totes for them too!


My practice one worked okay and 

I think I can make about 20 in the 

2 hour time limit!  It should be fun!


The  sew along is 

moving right along.  All the diamonds 

have their sides.  Eventually,

after 3 tries at cutting side triangles,

I ended up paper piecing the finishing 

sides. Even though I'm not fond of 

paper piecing, it sure makes precise

corners and seam allowances!


This was actually step 7 if you've visited the you tube channel.
 
Step 6 was a very cute periwinkle block.

I used a template to cut the periwinkle shape

out of scraps strips of blue. 

Then outside oversized triangles were 

added. Trim the whole thing down to 

3 1/2" and they were finished!

It was not too hard once I figured out the 

proper system to maintain a 1/4" seam allowance!


Now on to step 8. 

First, the beige rectangles ( step 1)are snowballed. 

This uses up all the plain brown squares from step 3.


The brown blocks are pressed in half to mark the stitching line. 

The off cuts are used to make hourglass units. 

One creative sewer, stitches down the side of the 

square to make 1/2 of the hourglass and the snowball 

all at once.


It only requires 32 hourglass blocks so 

 leftovers can be made into pinwheels for 

use in another project!

Step 8 is well on its way !


Off to the race!

Stay safe and sew on !

Linking up with:


Thursday, July 3, 2025

Coming Along on Sew Along

Sew, as you know, I jumped onto a sew along over at

Conquering Mount Scrapmore, Brenda Logan's site.

I'm making pretty good progress.

This is the little project that got me started

on the spring sew along.

I was making 4 1/2" beige/crumb strips

for this scrap quilt project with crumb squares.


It required these two units. 


I had a mass of beige strings left so when I 

came across the sew along  

working with beige strings,

I jumped right on. 

Here's what I have so far!

Step 1

I have a 3 1/2" ruler so that made 

the first step easy.

Step 2


The second part moved along quickly, 

making little diagonal string blocks. 

I even had some larger brown blocks that quickly cut 

down into the correct size. 

Step 3

This step just required plain squares so it 

was easy. 

Step 4

A classic peaky and spike block 

was next. I made it with the 

tri tool & rex tool by EZ quilting. 


Step 5

Then another peaky and spike in a different 

color combination for step 5. 

Step 6

Step 6 is more challenging.  It is a 

stretched diamond with beige corner triangles. 

Not one ruler I have would match the corner

angle so I made a cardboard template to assist. 

The corners are not on but the center diamonds are complete.


Step 7 

TBD

Step 8

TBD

Step 9

TBD

Step 10

TBD

Step ?

I'm not sure how many steps this sew along will have,

but I'm not really figuring out what it's going to look like!

I thought I had it figured but then some four patches

and pinwheels came into the mix on step 10! 

I guess we'll just have to

stay tuned and see what happens.

Still working on the TBD (to be done) blocks

and I want to be finished with the sew along by month end

if the steps stop coming! 

Scraps only this month, no fabric purchased!

Stay Safe and Sew on!

Linking up with:

Monday Musing

Sew & Tell

Design Wall Monday 

To Do Tuesday

Wait Loss Wednesday

Put Your Foot Down

Needle & Thread Thursday

Free Motion Mavericks

Stash Reporting

One Monthly Goal July

Design Wall Friday

Finished or Not Friday

RSC 2024

Patchwork & Quilts